By Laura Swanson
Blueberries are a treat in our landscapes in so many ways – an early bloomer/bee food, of course, the fruit and then brilliant red Fall color. A local blueberry pruning icon, Kathleen Moore gave a demonstration of blueberry pruning on my 15 year-old blueberries. I have three varieties (Bluecrop, Darrow and Chandler) – an early, a mid-season and a late season – which keep us in blueberries from June through September.
Kathleen Moore has over 40 years of blueberry pruning experience and as she explains, she’s fascinated by the plants unique four year growth cycle. Here are her tips and instructions, and scroll down for a step-by-step YouTube video on the Pioneer’s channel.
BLUEBERRY PRUNING
by Kathleen Moore
Our goal is to turn a crowded, jumbled plant into a graceful work of art! (As Kathleen commented, the bush should look like a lady dancing in the wind we are finished!)
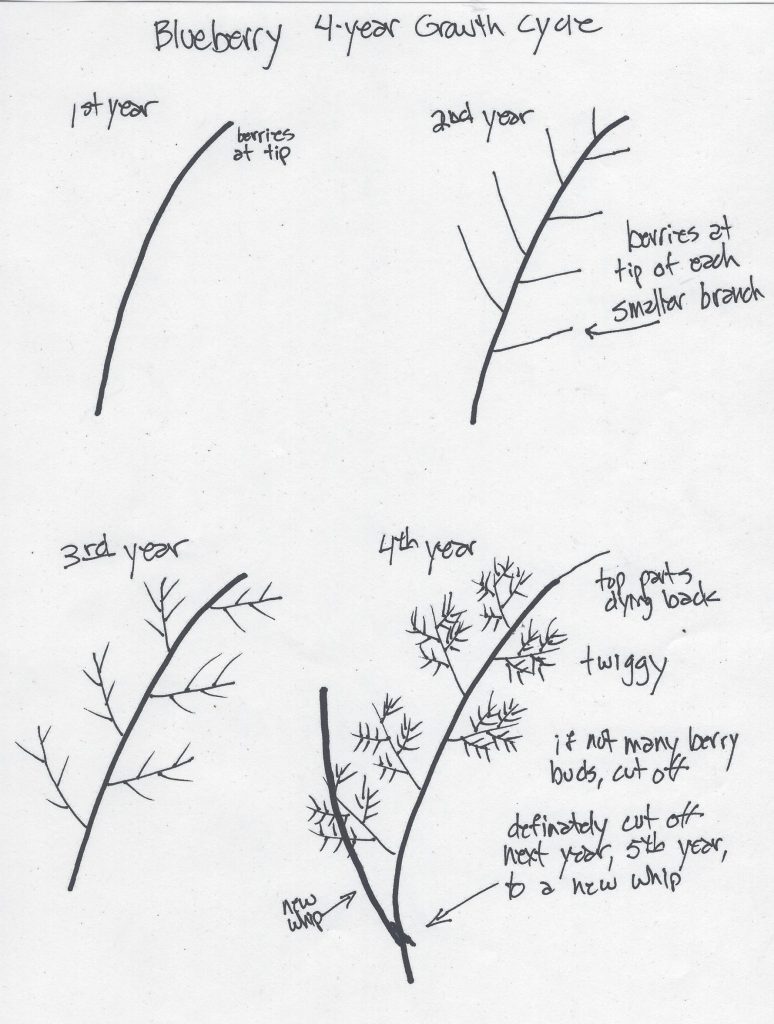
Blueberries have a very unique growth pattern. They are unlike any other plant I know. It is best to keep the following growth patterns in mind as you prune each year. This helps you decide what to leave and what to prune out.

2nd year growth: Produces branches coming out all down the whip from last year. These will be your most productive branches.
3rd year growth: Has smaller branches coming off the berry-producing branches from last year. These will bear well, but produce fewer berries this year.
In the 4th year: The branches look all twiggy with few berry buds on them it is best to take them out this year, or definitely next year.
I will explain the best way to do this later on.
The idea is to have all 4 years of growth on the plant at one time, each year taking out about a third of the plant to start the cycle again.
It’s important to know what your berry buds look like. They are generally fatter, rounder, though on some varieties, they are a bit elongated. Later in the season, you will see the leaf buds come out. They are always thinner and pointy. Don’t worry about having enough leaves, the plant always makes plenty!
When is the best time to prune? When it’s cold – January or February (early March) – Note: At one of Kathleen’s demonstrations, it was snowing!
You can do it after blooms open, but this is not optimal because the plant has lost energy trying to nourish all the blooms.
TOOLS YOU WILL NEED: Hand pruners, loppers, saw, alcohol spray or dip.
PRUNING STEPS:
Look over entire plant – where is it too crowded? Where are good whips? Cross overs? Limbs going into neighbor plants? Does the center need to be opened up? Start pruning in these areas.
If in doubt, just cut down the stem a little way, then look at it again.
Take out only a third of the plant each pruning season. This tells the plant to make new whips, so the cycle continues on.
Make a pile of prunings near you, but not underfoot. This is how you keep track of how much as been taken out. Be sure to remove these when you’re through pruning.
Twiggy parts are where past berries were; THANK THE PLANT for all the wonderful berries you have eaten from this area.
Look on the branch you are about to prune out. Where it attaches to the other branch there will be a collar, sort of like turtle neck. Cut to this collar, not right up to the branch. Research shows that cuts heal much better this way. Also do not leave a long piece sticking out – this invites disease to enter. Cut to the collar.
Keep isopropyl alcohol in a spray bottle or plastic container with a lid. Dip or spray your tools to disinfect them after you’ve cut something that looks diseased, and always when moving to the next plant.
The best cutting angle when using pruners is with the flat cutting blade toward the stem. This makes a cleaner cut right where you want it. Practice shifting your wrist around so the proper angle is achieved.
When you have a 4 or 5 year old branch, with lots of brown twiggy areas and not many berry buds, start at the top, and keep looking down the stem. Pull it out from teh bush a bit if you need to see it more clearly. Some branches will have just 2 to 5 berry buds – not worth saving – it’s better to rejuvenate the plant. Keep looking down the branch until you see a healthy whip coming out. Prune to this spot. This way all the energy coming up from the roots will go into the new whip and its berries.
If there are no whips coming out of this old branch, cut the stem with loppers to about knee height.

Another cool think about blueberries is that they can send out new growth from anywhere on the old branch, not like a rose or apple that only sends out new growth from leaf buds or joints.
Step back, look at the plant. Notice and clean up any congested areas. Keep looking, and moving around the plant.
Clear out the center a bit unless there are very healthy whips and berries in there. You can always cut them out in following years, after they have produced. Thin this area.
You want sunlight and good air circulation to reach into the plant.
It takes 2 to 3 years to bring an old bush back into shape.
Don’t worry, have fun, thank the plant for all it’s past berries, and look forward to the new harvest, year after year!


