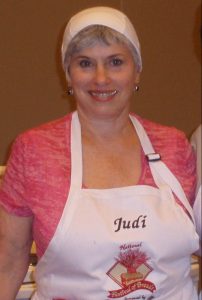
By Judith Yamada, The Kitchen Maven
To most people, a cook and a chef are the same. A synonym for “chef” is “cook” and vice versa. The titles are used to indicate someone working in the kitchen, regardless of whether that individual is cutting vegetables or creating the entire menu. The titles are so often used interchangeably that the differences are confusing.
I started thinking about this topic, as an article, after recently sampling an entree prepared by a friend, who’s a pretty good home cook and, soon after, when I was having breakfast with an acquaintance in a local cafe. She mentioned the subject during our meal. Of course, I have my own opinion, but decided to research what others had to write on the topic.
For those who work in the culinary field, there’s a big difference. Although there’s no professional organization that determines exactly who qualifies as a chef or cook, most agree that the difference lies in education and experience. Makes sense to me.
Technically speaking, a chef is someone who essentially obtains a professional degree and prepares food in a professional setting. A cook, on the other hand, may not be professionally trained and may or may not cook professionally.
Typically, cooks prepare food according to set recipes, and do so without deviation. They require recipes with exact measurements and ingredients to get good results. Chefs like to experiment and have more autonomy and inclination to create their own recipes.
Some say, “A chef is someone who is, or at one point was, paid to make food. If you’ve never cooked food as a career, it’s going to be difficult to convince people who really care about the difference to call you a chef.” Good point. But, in my opinion, being paid to cook in a public enterprise does not, necessarily, a chef make.
“Chefs are often responsible for planning menus, ordering foodstuffs, overseeing food preparation, and supervising the kitchen staff.” But so are home cooks, although the kitchen staff at home may be a spouse or an 8th grader.
I agree with the idea that chefs can take (often humble) ingredients and transform them into something delightful. Can most cooks do that? The word “delightful” in that sentence is very significant.
Some believe that “Cook is a job title. Chef is a way of life.”
Well, maybe so. But I think most writers, readers, cooks, chefs and eaters would agree:
Even if being a chef isn’t your “job”, if cooking, baking, entertaining and eating great food are your passion, then it’s a way of life. And if you have education or experience (thus knowledge) that enables you to create and execute delicious culinary creations, which both you and other people enjoy – then you know what you are.
Some helpful hints for novice cooks:
•Season your food to taste. Don’t necessarily go by the amount of salt listed in a recipe. You may need more or less than the recipe suggests. Always salt soups and stews near the end of cooking. Always taste before eating or serving. One of the biggest mistakes novice cooks make is under and over seasoning. And remember that even cakes, cookies, etc. need a little salt to bring out the flavor.
•Try being creative with recipes and making them your own. A research-motivated way to do this is to look over other recipes that might be similar to yours. After looking at several (the internet is great for this) modify yours based on your own tastes, abilities and what you have handy.
•Brighten finished dishes with a squeeze of citrus or a drizzle of high quality fruity oil. It livens the flavor and gives the food a pop.
•Get rid of those dried herbs that have been sitting around longer than one year (maximum). Try growing fresh herbs or buying some with your grocery purchase. They make a huge difference in the taste and appeal of your food.
•Keep it simple and as seasonal as possible. And don’t experiment on guests. Try recipes (even your own creations) a couple of times before spreading them around.
•Novice cooks tend to be disorganized. Be prepared. Preparation, prior to actually cooking, is key.
•Clean up the kitchen as you cook. Use your time well.
For more straight forward tips, for home cooks, from a chef:
https://tasty.co/article/jesseszewczyk/tips-cooking-like-chef
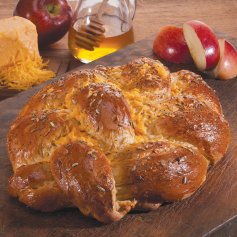
 Here is one of my own holiday bread creations from the National Festival of Breads:
Red Apple Golden Cheddar Challah Bread
National Festival of Breads Finalist
Judi Berman-Yamada, Portland, OR
Prep Time: 45 minutes; Bake Time: 40 minutes; Yield: Makes 2 large loaves, 16 slices each.
Ingredients
2 cups lightly packed, coarsely shredded red apple with skin, about 2 medium apples*
1 tablespoon fresh lemon juice
½ cup warm water (100° to 110°F)
¼ cup honey plus 1 tablespoon honey, divided
2 (1/4 ounce) packages Active Dry Yeast
1 cup King Arthur White Whole Wheat Flour
1 tablespoon sea salt
2 tablespoons vegetable oil
2 large eggs, beaten
4 – 4 ¼ cups King Arthur Unbleached Bread Flour, divided
2 cups coarsely shredded, extra sharp Cheddar cheese
TOPPING
1 large egg plus 1 tablespoon water
2 teaspoons fennel seeds, sesame, or poppy seeds, divided
½ cup coarsely shredded, extra sharp Cheddar cheese, divided, optional
*Two varieties of apples may be combined, for example, Braeburn apple and Pink Lady apple.
Instructions
Combine shredded apple with lemon juice; set aside. Combine warm water and 1 tablespoon honey. Sprinkle in yeast; stir until dissolved. Let stand 10 minutes.
In large mixer bowl, with paddle attachment, combine yeast, white whole wheat flour, salt, ¼ cup honey, oil and 2 eggs. Beat 1 minute.
Gradually add 2 cups bread flour; beat 2 minutes on low speed; scraping bowl. Mix in shredded apple and 1 cup bread flour; mix on low speed until flour and apple are incorporated into dough. Add 2 cups cheese; beat on low speed 2 minutes.
Gradually add enough of the remaining 1 cup bread flour until soft dough is formed. Add the last ¼ cup flour, only if the dough is too sticky. Knead with dough hook or by hand 8 to 10 minutes until soft and elastic. Place dough in greased bowl, turning to grease surface of dough. Cover; let rise in warm, draft-free place until double in size, about 1 hour.
Punch down dough; divide dough into half. Divide each half into six equal pieces; cover, let rest 10 minutes.
Six-Strand Braid: Roll each piece of dough into a 12-inch rope, tapering ends. Lay 6 ropes side- by-side; pinch together at top. Always start with the rope that is furthest to the right. Take the rope furthest to the right and weave it towards the left through the other ropes using this pattern: over 2, under 1, over 2. Take the ropes furthest to the right and repeat the pattern again until the whole loaf is braided. Pinch ends together; tuck under loaf and seal. Transfer braid to a parchment-lined baking sheet. Repeat with remaining half of dough. Cover; let rise in warm, draft-free place until double in size, about 45 to 60 minutes.
Whisk egg and water until frothy; gently brush on the risen braids, and sprinkle each braid with 1 teaspoon seeds.
Bake in preheated 350°F oven 20 minutes. If desired, sprinkle ¼ cup cheese on top of each braid. Rotate pan, front to back in the oven. Bake an additional 15 to 20 minutes. Tent loaves with foil; bake until golden brown and thermometer inserted in the center registers 190° to 195°F. Cool braids on pan 10 minutes; remove to rack. Bread may be frozen for 1 month; defrost in bag.
Nutrition Information
One slice provides approximately 142 calories; 6 g protein; 20 g carbohydrates; 1 g dietary fiber; 5 g fat (2 g saturated); 27 mg cholesterol; 34 mcg folate; 1 mg iron and 283 mg sodium.
Kansas Wheat Commission Test Kitchen Note: Use the dough to make about 2 dozen Challah dinner rolls.

